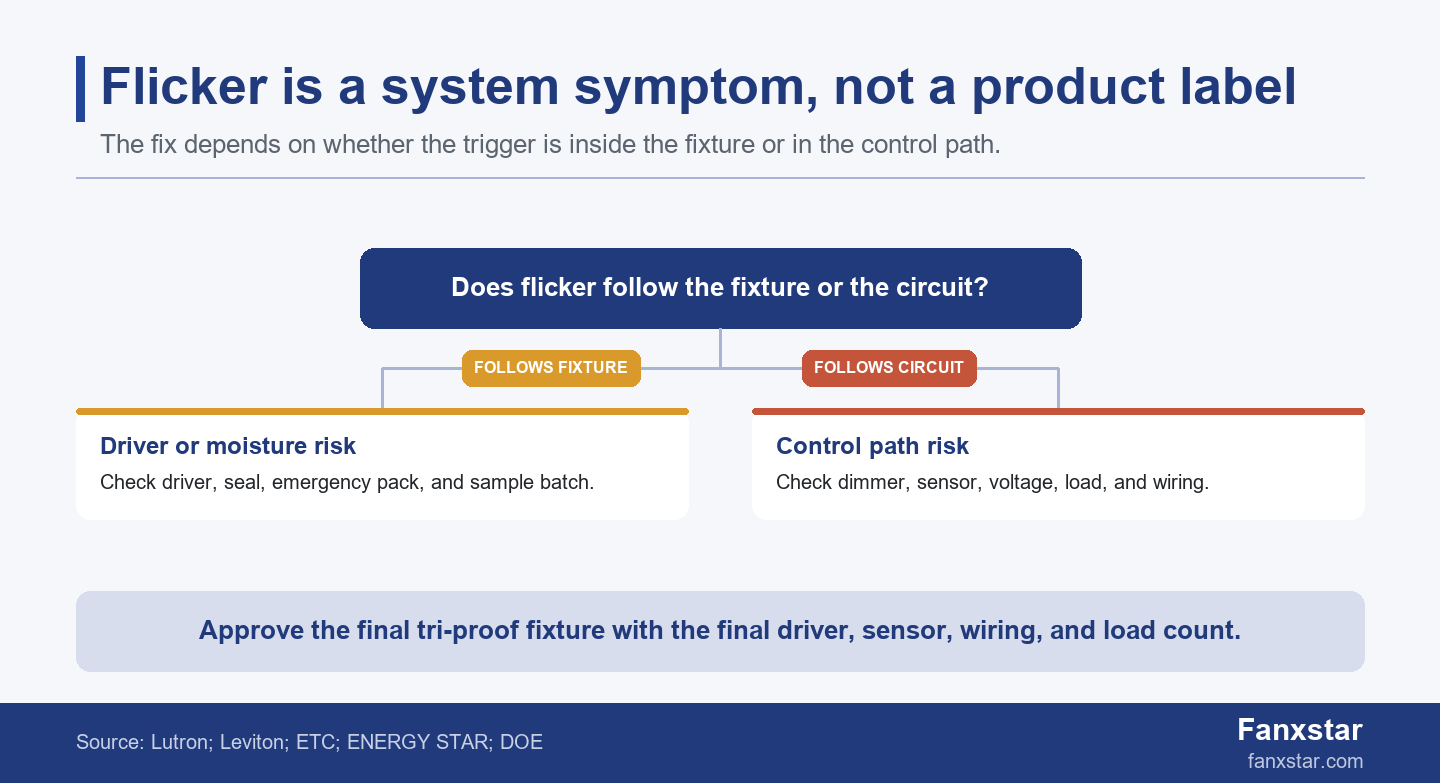
A flickering LED tri-proof light should be diagnosed as a fixture-control-site system problem, because the same sealed luminaire can flicker from driver choice, dimmer mismatch, sensor wiring, voltage instability, moisture ingress, or batch substitution. A buyer who replaces the fixture first may miss the real trigger. The correct path is to identify whether flicker follows the fixture, follows the circuit, follows the control event, or appears only after moisture, heat, or batch substitution.
Leviton LED dimming troubleshooting says LED bulbs may experience dimmer compatibility issues that cause flickering or turning off during dimming. ETC LED dimming compatibility guidance also frames LED fixture and control compatibility as a specification and implementation challenge. Those two sources point to the same buying rule: test the fixture and control system together.
Key Takeaways
- LED tri-proof flicker can come from the driver, dimmer, sensor, voltage, wiring, moisture, emergency module, or batch-level component change.
- The fastest diagnosis is a split test: does the flicker follow the fixture when swapped, or does it stay with the circuit and control path?
- Dimmed and sensor-controlled tri-proof fixtures should be tested with the final driver, final control device, final load count, and expected wiring method.
- Moisture and cable-entry problems matter because a sealed fixture can be damaged by poor installation even when the catalog IP rating looks correct.
- Fanxstar projects should add off-state, dimming, sensor trigger, and sample-batch flicker checks before approving volume production.
Start With the Symptom Pattern, Not the Product Name
Flicker can be steady, random, dimming-related, or trigger-related
Tri-proof light is an enclosure and application term. It does not tell you why the LED is flickering. A sealed fixture can flicker because its driver is weak, because the dimmer and driver do not match, because a sensor relay is switching a difficult load, because voltage is unstable, because a neutral or wiring path is wrong, because moisture reached a connector, or because a production batch changed components. The symptom pattern narrows the search.
Lutron minimum-load application note discusses glow and flashing symptoms related to insufficient minimum load and leakage current. While that note is written for LED and CFL dimming behavior, the principle transfers to commercial tri-proof procurement: the LED driver and the control path must be evaluated as a system. A sealed fixture does not make a poor control match disappear.
| Symptom | Likely area | First evidence to collect |
|---|---|---|
| Flicker only on dimmed levels | Dimmer, driver, low-end trim, minimum load | Dimmer model, driver model, load count, low-end setting |
| Flicker after sensor trigger | Sensor logic, relay, driver inrush, wiring | Sensor type, switching mode, fixture quantity, trigger pattern |
| Flicker in one fixture only | Driver, connector, moisture, internal fault | Swap test, seal inspection, driver label, batch number |
| Flicker across a circuit | Voltage, wiring, control device, shared load | Circuit measurement, neutral condition, control diagram |
| Random flicker in wet area | Moisture ingress, cable gland, gasket, condensation | IP boundary, installation photo, cleaning exposure |
The swap test separates fixture risk from circuit risk
If one fixture flickers, swap it with a known good fixture on another circuit. If the flicker follows the fixture, inspect driver, internal connector, moisture, emergency pack, sensor module, and batch identity. If the flicker stays with the circuit, inspect dimmer, sensor, voltage, load quantity, wiring, and shared controls. This is a diagnostic logic, not a live-wiring instruction. Electrical work should be handled by qualified personnel under local code.
For buyers, the swap test is useful because it prevents a large replacement order based on one weak symptom. A contractor may blame the fixture because the flicker is visible at the fixture. A supplier may blame the site because the fixture works on a bench. The test gives both sides a better evidence path.
Driver, Dimmer, and Sensor Compatibility
Dimming needs a matched driver and control range
Leviton support guidance on LED flicker notes that setting minimum and maximum dim levels can improve dimming performance. In a commercial fixture program, the same idea becomes a sample rule: the buyer should test the actual driver and control method at low end, high end, switch-off, switch-on, sensor trigger, and repeated cycles. A temporary demo dimmer does not prove the production system.
ENERGY STAR-hosted NEMA LED dimming material discusses LED dimming compatibility criteria. If a tri-proof fixture will be sold with 0-10 V dimming, DALI, relay switching, microwave sensor, PIR sensor, or emergency function, the buyer should not approve the enclosure alone. The control file should name driver, sensor, dimmer, wiring assumption, load count, and observed behavior.
Sensor switching can reveal a marginal design
A motion sensor can create flicker by switching a load the driver does not like, by retriggering too quickly, by interacting with a standby circuit, or by exposing inrush and driver-start behavior. The sensor may not be defective. It may simply be paired with the wrong driver, wrong load count, or wrong wiring method. This is why sensor-ready tri-proof projects should test the complete kit, not only the fixture body.
Use this as a scenario estimate for tri-proof flicker diagnosis. Based on our analysis of this scenario, 10 units should be tested together before approving a sensor-controlled batch. Based on our analysis of this scenario, 24 hours of burn-in can reveal early driver or moisture-related behavior. Based on our analysis of this scenario, 1 hour of operation before switch-off makes the test closer to site conditions. Based on our analysis of this scenario, 7 days is a useful repeat-test window after a driver or sensor change. Based on our analysis of this scenario, 2 circuits should be compared when flicker may follow wiring rather than fixture. Based on our analysis of this scenario, 3 symptoms should be logged: steady flicker, random flash, and dimming dropout. Based on our analysis of this scenario, 5 data fields should be captured: driver, sensor, dimmer, load count, and batch. Based on our analysis of this scenario, 1 final compatibility file should travel with the purchase order.
Moisture, Heat, and Installation Causes
A sealed fixture can still fail from the installation boundary
DLC solid-state lighting technical requirements and DOE FEMP LED luminaire purchasing guidance keep buyers focused on the luminaire as a tested product. For tri-proof fixtures, the tested product includes the enclosure and cable-entry assumptions. If the installed cable gland, end cap, mounting stress, or cleaning exposure differs from the tested configuration, flicker can appear as an electrical symptom even though the root cause is environmental.
Use Fanxstar IP ratings guide when the site includes washdown, condensation, dust, or vapor. An IP claim should not be read as permission to install casually. Cable entry, gasket compression, fixture orientation, cleaning pressure, and connector protection all affect whether moisture can reach the driver or LED board. Flicker after cleaning or temperature cycling should trigger an enclosure inspection, not only a driver replacement.
Heat can expose driver margin
A fixture may pass a short bench test and flicker after hours in a warm ceiling, enclosed service corridor, parking deck, or industrial room. The cause may be driver thermal protection, poor heat path, mismatched emergency pack, or an under-specified component. Tri-proof housings can protect against moisture and dust, but they can also trap heat if the design is not matched to power and environment.
When flicker appears after warm-up, the buyer should log ambient temperature, fixture surface condition, mounting orientation, operating duration, power level, and whether the symptom appears across multiple fixtures. That evidence helps separate a site heat problem from a batch component problem.
How Fanxstar Should Be Used in Flicker-Sensitive Projects
Send the control package before asking for a final sample
For Fanxstar projects involving weatherproof LED lighting, vapor tight LED light fixtures, or motion sensor LED lighting, the RFQ should include the control package. That means driver preference, dimming method, sensor mode, fixture count per circuit, voltage, emergency option, cable entry, and operating pattern. Without those fields, the sample can look correct while the installed project flickers.
The related LED lighting controls guide is a useful companion because it separates sensors, dimming, and zones. Flicker risk usually increases when these layers are treated as accessories instead of system requirements. A smart procurement file makes the controls visible before sample approval. It should also name whether the product will be sold as on/off only, dimmable, sensor-ready, emergency-ready, or fully assembled with controls, because each route changes the sample test.
Use sample gates before volume release
A sensible sample gate includes visual flicker observation, low-end dimming behavior, sensor trigger cycles, switch-off behavior, warm-up behavior, and repeat testing after any driver or sensor change. The test does not need to be complex, but it must use the final parts. A sample with a temporary driver or missing sensor does not prove the production version. The buyer should keep a short video, a wiring note, and a driver label photo with the approval file so later production comparisons are possible.
For platform customization, Fanxstar custom LED lighting ODM service can help define fixture, driver, sensor, optics, and wiring options early. The key is not to promise flicker-free performance from a slogan. The key is to test the final system before releasing the order, then block silent substitutions that would invalidate the test. A buyer should also decide whether the approved sample becomes a golden sample for future orders, because flicker complaints often appear when a later batch quietly changes driver, sensor, or cable-entry details.
Buyer Checklist Before Approving the Fix
Document the symptom and the changed condition
Before accepting a fix, document what changed. Did the supplier change driver, dimmer, sensor, wiring, load quantity, emergency module, gasket, cable gland, or production batch? If a change removes flicker, the evidence file should explain why. Otherwise the same problem can return in the next shipment.
A good fix report includes fixture model, driver model, sensor model, dimmer or control model, circuit count, fixture count, voltage, symptom video, test duration, ambient condition, and final approved configuration. Buyers do not need a theatrical report. They need enough evidence to prevent the next batch from drifting. The report should also say whether the fix was verified on one fixture, one circuit, or a small production sample, because the confidence level changes with the test size. If production uses a different driver lot, the flicker gate should be repeated before release.
Know when to stop and use a qualified electrician
If flicker is accompanied by heat, burning smell, tripping, damaged insulation, water inside the fixture, abnormal noise, or uncertainty about live wiring, stop product troubleshooting and use a qualified electrician or local code professional. A blog guide can help structure questions; it cannot make live electrical work safe.
The final decision rule is evidence-based: approve the final tri-proof fixture only after the symptom has been linked to a fixture, control, wiring, or site cause and the approved sample uses the same driver, sensor, wiring assumption, and enclosure configuration that production will ship. If the site diagnosis is incomplete, release a small confirmation batch instead of converting the first fix into a full replacement program.
FAQ
Why does my LED tri-proof light flicker?
A tri-proof light can flicker because of driver failure, dimmer incompatibility, sensor switching, unstable voltage, wiring problems, moisture ingress, heat, emergency modules, or component changes. The first step is to test whether flicker follows the fixture or stays with the circuit.
Can a dimmer cause tri-proof LED flicker?
Yes. A dimmer or control device can cause flicker when the LED driver, minimum load, low-end trim, or switching method is not compatible. Test the final driver, dimmer, sensor, and fixture count together before approving production or replacing many fixtures.
Does flicker mean water entered the fixture?
Not always. Moisture is one possible cause, especially after washdown, condensation, or cable-entry failure, but flicker can also come from controls, wiring, voltage, or driver behavior. Inspect the enclosure only as part of a structured diagnosis.
What should buyers ask Fanxstar before ordering?
Buyers should send the application environment, IP target, voltage, control method, sensor type, fixture count per circuit, emergency option, and flicker-test expectations. Fanxstar can then match the platform, driver, sensor, and sample gate before volume production.